Small Block Chevy Swap Stories: How to Fit One in Almost Anything
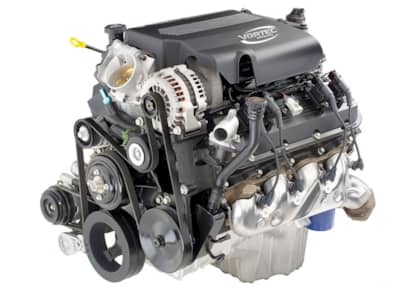
We all want to go faster in our vehicles, and a lot of time, we're limited by the options available for each particular model. Though every engine can be modified for better performance, not all of them can produce big numbers. This is where the small block Chevy (SBC) has been the solution to many looking to gain some extra ponies.
Yes, there are other options in the world today, but none are more readily available or as easy to install. This revolutionary engine was first birthed over a half a century ago and since then, many aftermarket companies have perfected products to help them make more power. Because they are so common, there is no better bang for your buck when it comes to engine swaps. If you are on a tight budget, decent older blocks can be found for only a few bills. As long as the block is solid, you can rebuild it with one of the numerous kits on the market.
If you aren't so technically savvy, there are numerous crate engines on the market as well. Short blocks come with just the basics like the block, rods, pistons and crankshaft already assembled. For most, long blocks are the way to go, as you get everything a short block has plus heads and many other pieces depending on where you purchase one.
Once you’ve decided to swap in a SBC, there are many things you will need to consider. For classic vehicles, many of them came with them this V8 as an option, so making one fit won’t take too much effort. For other models of vehicles that were never equipped with a SBC, you should research what is needed to make one run. Sufficient air, fuel and power are the three basic components that make an engine like this work. When you have a running motor, you also need to control the throttle, keep it cool and have a means to transfer rotational force to the wheels.
When it comes down to it, the elements to make a SBC run are very basic. There are no computers needed if you are running a carburetor, which makes it easy to drop one in just about anything. Size is pretty much the only thing that can be an obstacle. Also, keep in mind that it may not be emissions legal to run a SBC in a later-model vehicle in certain regions and it is your responsibility to research this—but there are California emissions legal blocks available. Our ’62 is emissions exempt, so we don’t have to worry about it. If you can check all these boxes, you'll be able to take advantage of the 300+ hp these engines put out.
’62 GMC Swap
When we picked up this ’62 GMC, it had a 305 ci V6 with 63k on the odometer. With relatively low miles on it, the original engine still ran OK for its age. That said, it had a few problems, like hard starts, leaking seals and exhaust, a faulty fuel pump and a dying starter. Since this motor is obsolete and no longer desirable, replacement parts are hard to come by—if they're available at all. We knew that this engine was a ticking time bomb and it was only a matter of time before it gave out. Because it was giving us issues, we had let it sit while we saved up enough cash to swap in a better drivetrain.
We thought about building an engine, but it would have taken more time to get the truck back on the road. Our best option was to drop in a crate motor, so we ordered one from Blue Print Engines. With our budget, we decided on the dressed small-block package, which includes a 383 ci engine and roller-cam. Ours was dyno tested and proven to put out 444.5 hp and 475.5 lb-ft at the crank.
This dressed package came with many of the essential parts including Blue Print’s 195 cc aluminum heads that are lightweight and optimized for maximum output. Our crate engine also came with an intake manifold, 750 cfm carburetor, HEI distributor, dip stick, oil pan, timing cover and valve covers. Though the engine came fairly complete, we did need to pick up a few parts to get it running in our ’62 GMC. This included a serpentine belt kit, starter, harmonic damper, flex plate, fuel pump, spark plugs and spark wires. To keep costs down, we looked to Summit Racing Equipment to get us on the right track.
The biggest problem we had swapping this high-powered V8 into our particular model and year truck was that there weren’t any engine mounts for our conversion. There are kits for other classic trucks but ours just happens to be an oddball model. To help with this and the installation time, we turned our project over to Devious Customs in Riverside, California. The skilled crew at the shop had our old engine pulled out and the Blue Print 383-stroker mounted within the first day. Of course, there was a lot more involved to get it all running, but after a few days of wrenching, the truck was alive again. If you want to know the step-by-step process of installing an SBC, keep reading.
Making Room
To make way for the new SBC, our old V6 was ditched along with just about everything in the engine bay. A torch was used to remove the factory engine and transmission crossmember mounts, as we were going to have to fabricate new ones for this particular truck. This can also be done with a number of other tools like a plasma cutter, sawzall, grinder or a rotary tool with cut-off wheel.

Accessory Drive
We wanted the engine to power an alternator, water pump and power steering pump off the crank. First, we had to install an 8-inch harmonic damper and then the Summit Racing serpentine kit was prepped. There is an option for air-conditioning, but we decided against it since it was not a necessity.

Fuel Delivery
The beauty of these engines is that they don’t require much to get them running. To get the most basic element, fuel, to the engine, we installed a mechanical fuel pump. As the crankshaft turns over, the pump is activated to suck gas from the tank and deliver it to the carburetor to mix with air for combustion. Here we bolted it up and later we ran new fuel lines.

Transferring Power
When it comes to upgrading the transmission, there are many options, and most choose a three-speed to do the job. We opted for an overdrive 200 4R from California Performance Transmission, as this transmission is a three-speed with an overdrive gear for better fuel economy at highway speeds. This particular transmission also has better gear ratios, making for smoother shifts than other commonly used overdrive models. We made sure to get a 2,000-2,400 rpm stall torque converter, which matched the specs of our camshaft. A flex plate was bolted to the crank, followed by the torque converter and transmission.

Configuration
With no prefabricated mounts for this engine and transmission package for our specific truck, we had to set it in position and build them. The carburetor was removed for a lift plate to be attached to the intake manifold to allow the unit to be raised. Most commonly used is an engine crane or cherry picker, but Devious Customs used a forklift. The distributor cap was removed for better clearance and the whole unit was tilted and lowered in. A floor jack was utilized to lift the rear of the transmission as the engine was lowered. Once in the engine bay, the motor was set to lean back at 3.5 degrees to line up with the drive line.

Mounting
When dropping in a new drivetrain, you will need to make sure that everything fits in place. Sometimes there will be a lack of clearance near the firewall or the vehicle’s floor pan. Another common issue to watch for is oil pan clearance. In these cases you may have to modify the vehicle to make it fit. Fortunately, we did not have any of these issues and were ready to mount the engine. We used mounts with bushings from Energy Suspension and bolted them to the engine and transmission. Then custom mounts were made and welded to the truck.

Throttle Linkage
In order to tell the engine to operate as desired when the go-pedal is mashed, the two need to be linked up. We used a Holley adjustable throttle return spring bracket and mounted it to the carb. There are two springs on it to help prevent the throttle from getting stuck in the open position. In the event that one of the springs breaks, there is another to rely on. We created a custom linkage to connect the throttle lever to the carb. The transmission cable was also hooked up to the carb and adjusted. Its purpose is to tell the transmission when to shift.

Exhaust
To expel spent gases from the engine compartment, an exhaust system needs to be attached. We were able to bolt on a set of mid-length Hedman headers to the aluminum heads of our engine. Again, with some vehicles there may not be a pre-made exhaust system. For this, we turned to a local muffler shop to bend some tubes with mufflers and attached them to the end of the headers. You can also see here that we installed some spark plugs, which were later wired to the distributor where we made sure to match them with their corresponding terminals.

Cooling
Another thing to keep in mind with an engine swap is how to keep it cool. Though the original radiator might have worked, we didn’t want to take any chances on this high-power engine. We dropped in this three-row aluminum radiator with 3,300 cfm electric fan from Flex-a-Lite to maintain adequate air-flow to keep coolant temperatures down. Later, we raided our local parts store to find a set of hoses to connect it to the water pump and thermostat port.

Trans Cooler
Heat can be an issue for transmissions as well. To help keep ours cool we ordered an external unit that we also got from Flex-a-Lite. It was mounted in front of the radiator to make use of the fan’s airflow. Once in position, we ran the proper lines to the cooler and from the ports on our 200 4R.

Driveshaft
When doing an engine swap you, should keep in mind that the distance between the transmission and the rearend will be different. After taking a few measurements, we took our specs to a local driveline shop and had this driveshaft made. With our power rating of the SBC, they recommended a 4-inch aluminum driveshaft.

Fuel Tank
As the engine was all set up, we needed to configure our fuel storage. Originally, our truck had a tank mounted in the back of the cab. This was a terrible design as fumes were always present. Also, the tank was corroded inside, which is bad for engine performance. We decided to replace it with a stainless steel tank from Rick’s Tanks. Though many people use aluminum tanks, they can crack over time. We made sure to have ours prepped for a carbureted engine and mounted it in the rear of the frame. A level sensor was installed and then the hoses were attached.

Interior Components
Performing a swap of this kind can require many parts to make it functional. Since we didn’t want to spend countless hours trying to figure how to make the factory gauges work with the new engine, we ordered and hooked up a system from Auto Meter. Leaving one less wire to hook up, our speedometer is now triggered by a GPS antenna mounted on our dash.

Though the old steering column did have a shifter for the manual transmission, we decided to get a new Flaming River steering column to make it easier to connect to our new automatic trans. We were also able to get a tilting version with an indicator for our overdrive transmission. Then, the lever portion of it was linked to the shift lever on the transmission with the use of a kit from Lokar Performance Products.
Final Prep
After everything was installed, the motor was filled with all the proper fluids including oil, coolant, power steering fluid and automatic transmission fluid (for new engines, break-in oil is recommended for the first 500 miles). Then it was wired up to a battery and the starter was wired to the original ignition system. The next steps were to adjust the engine timing on the distributor and fine-tune the carburetor.

With the swap finalized, we were ready to take advantage of our new engine. Making sure all the pieces of this puzzle work properly is not child’s play, but it was all worth it in the end. Planting in this new SBC made our truck function better than ever. It also came with the benefits of roasting the rear tires whenever we want to and that always brings a smile to our face.


